Ordering Custom
Stained Glass or
Beveled Glass
- The Commission Process -
Hello
and welcome to my Commission Process page. Whether
you're thinking about commissioning stained glass from me or from
another glass artist or studio, this page should help
you to understand the discussions that the studio and client engage in
when deciding how a stained or beveled glass artwork will look and what
it will ultimately cost. If you think I've left anything
out, please let me know.
. 
Visitors have
my permission to
print this page, click here to print
this page.
To see photos
of stained glass being built , go here to the
stained glass process.
The
Distance Factor:
If
you live in or near Denver, Colorado, we would probably meet to discuss
the information that you will find on this page. However, I now get
more clients from the Internet than locally, so working
with people by phone or email has become the primary way
that I
conduct my business. While I am willing to travel for large projects
that may require an onsite consultation, I have completed many
commissions without ever meeting the people who patronize me. To make
this easier for you and for me, I have tried to design this web site so
that all of the basic information is here on my "LEARN" pages. The rest
can
be accomplished with phone conversations
or emails.
When
a commission must be shipped to clients that do not live near my
studio, there is a cost for sturdy crating and
insured shipping of the artwork(s). For small artworks, I have had 100%
success with double boxing the artwork and shipping it via the Post
Office, FedEx, or UPS. Medium and large artworks will need to be crated
and shipped by a specialty shipper. I generally use Craters and
Freighters because they crate the artwork and insure it for
its full value themselves, which means they do a very good job. The
additional cost of shipping means that some potential clients will
choose, in the end, to find a local stained glass artist or studio. If
this is an option you may want to explore, my Craftsmanship
page can be very useful in helping you to decide whether you might be
satisfied with a local artisan - or choose
to
patronize me because you want to acquire the very
best in
terms of original design and precision craftsmanship. Obviously, the
people who patronize me are willing to
accept shipping costs in order to obtain the very best.
Factors
That Determine the Cost:
The
cost of a commission in stained glass or beveled glass depends on the
size of the artwork, but even
more on
the intricacy of the design (the more intricate the
design, the more time required to create the artwork). Occasionally, a
certain color, type, or texture of glass may significantly influence
the cost of an artwork. You've probably heard of cobalt blue glass...
that's a glass in which cobalt is the chemical element that produces
the royal
blue color you've always associated with the words "cobalt blue". Well,
some pink glasses are colored with gold,
and some
other colored glasses are colored with other costly elements. Although
choosing a more expensive glass can affect the cost of a
stained glass artwork - even after the design and price are agreed upon
- most of the glass samples I show clients fall into a normal
price range
and are accounted for in the price quote that accompanies each design.
Also, the increase in price due to an expensive glass is
just a material cost, usually in the range of $20 to $50, not very
significant when compared
to the cost of the whole project. Other factors that might affect a
price quote
are when a client chooses to include beveled glass, glass "jewels", or
a glass that is expensive because it's a hand blown glass. I always try
to include all of the options that a client and I have discussed in
every quote I give, but some options are chosen later in the commission
process and require the cost of the artwork to be adjusted. In
general, before I would quote you a preliminary estimate of the cost of
the proposed artwork, I would ask you a series of questions that would
reveal and prioritize your desires, needs, and constraints concerning
the project. Once I have some idea of the style and level of intricacy
you have in mind, I would give you a preliminary quote. Subsequent
scale drawings that I would produce would each have an exact
price accompanying them.
Here
is some information that might help you to better understand the
relationship between what you get and what it costs.
| $90
to
$150 per square foot |
For
the
very simplest of designs
(based primarily on straight lines, sometimes with a few
simple geometric shapes or soft curves). Simple can be nice! See some here. |
| $150
to
$250 per square foot |
Most
of
my commissions fall into this "mid-priced" range, including
designs
that are not-too-simple and not-too-intricate. Seen an example here1 or here2. |
| More
than $250 per square foot |
There
really is no upper limit for
the most intricate designs... I have even created artworks that sold
for over $500 per square foot. Unless you specify otherwise, I would
assume that you
aren't thinking of anything in this price range! Examples that are over
$200 per square foot can be seen here1
or here2 or here3. |
Let's get even
more specific...
You can return to
the "artworks
for sale"
section of my Gallery, where you will be able to view examples of
artworks incorporating different levels of intricacy and the price
ranges they fall into. This is a good place to start since even the
thumbnail images are accompanied by prices.
Or, you can use
the following links to go directly to pages that show artworks that
fall into different price ranges. For example, Bevels
w/ Blue, Concentrics,
and Clearly Abstract are
examples of artworks that fall into a $70 to $120 per square foot
price range (although, in "Bevels w/ Blue," the wholesale cost of the
bevels would be added on to the square foot price). Native American Door, Colorful Entryway, and Lollipop
Jungle #1 would
fall into the $120 to $200 per square foot range. Art
Nouveau, Giselle,
Study for My Lady,
and The Pantry would fall
into a
price range greater than $200 per square foot.
One final
noteworthy factor in pricing...
The price per
square foot drops significantly as the total number of square feet
rises.
This happens for
two reasons...
- It's much more
efficient to do large projects than it is to do small
ones. This is because some of the costs you will be
paying me for are more or less fixed, regardless
of the size of the commission. Examples of these fixed costs
are [a] time spent talking to clients, [b] time spent developing
designs, [c] time spent purchasing materials, and [d] time spent
shipping
or installing the finished commission. To elaborate further on just one
of these examples... I spend about the same amount of time buying
supplies from my local wholesale supply outlet for a large commission
as for a small one. So this cost is a smaller percentage of a big
commission than it is for a small commission. Note:
This also leads to another phenomenon: while more intricate designs
certainly do cost more than less intricate designs, it often seems to
customers like they're getting "more for their money" with larger
and/or more intricate commissions than with smaller
and/or less intricate commissions. This occurs because once the fixed
costs are paid for, all of the additional dollars invested
by the customer go for time spent in the studio by me, the artist, and
that time spent translates into intricacy of design.
- The level of
intricacy per square foot is generally less with larger commissions.
Take a design... any design. Now double the size of the proposed
stained glass commission. Does doubling the size double the price? No.
That's because blowing up the design to twice the original size
significantly reduces the intricacy of the design per square foot. The
individual pieces are now twice as large, resulting in a design that
has half as many pieces per square foot. For example, a design that
costs $250 per square foot in a 2 foot by 2 foot size (4 square feet
times $250 = $1000) might only cost $180 per square foot in a 3 foot by
3 foot size (9 square feet times $180 = $1620). The size went up by
225% but the cost only went up by 162%. A veritable bargain... Yes?
There is one more thing to
consider about
cost... The most helpful piece of information you can give me
is
the maximum amount that you want to spend. Knowing this allows me to
subtract the shipping costs - for non-locals - and determine whether I
can do what you want for the remaining amount. It also allows me to
make informed suggestions on how to stay within that amount.
In my many years of doing this, it
has become
apparent that many people
are hesitant to tell me the maximum amount they are willing to spend. I
think it's because they're afraid that I won't show them any designs
that cost less
than that amount or I will show them a design worth less but charge
them
the maximum they said they'd want to spend. Other artisans or studios
might do this, but I never would. One of the things I like best about
what I do is that I do not have to manipulate or cheat anyone
in
the course of making a living. If you will trust me with knowing the
maximum amount you'll be willing to spend, I will still make
suggestions that could cost less than your stated maximum, I will still
create drawings that have varying pricetags, and no matter what I
design for you I will
never tack on an inflated price tag. So... decide what you want to
spend, and then give careful consideration to your feelings about
giving me that information. Although it is not absolutely necessary
that you tell me what your "price ceiling" is, there is no piece of
information that makes
the design process more efficient.
Design
Issues:
To
expedite the discussion of your desires, needs, and constraints, begin
to think and gather information about the following issues and
questions. Any glass artist you commission will need information
regarding the issues listed below in order to give
you an accurate preliminary price estimate. Even knowing which of the
following issues are NOT applicable to your particular situation is
useful information. Doing this ahead of time will help by not forcing
me to write out a list of questions for which you have given me no or
too little input!
Here we
go...
1)
How many panels do you need, and what are the shape and size of each
panel?
The
number of panels you'll
need is easy to determine. The shapes and sizes are a bit harder to
determine. I will try to explain that in detail.
Most
stained glass windows are square or rectangular. Fewer still
are
round, half-round, or octagonal. For square or rectangular windows, you
can send
me measurements. For round or other shaped windows, it may be necessary
to make a paper template of the window to send me. This is because a
round window is rarely perfectly round and an octagonal window is
rarely a true octagon. If making a pattern becomes necessary, I will
walk you thorough that by phone or email.
The
sizes of the stained or
beveled glass panels I will make for you will depend on the way you
will mount them, so I will discuss mounting options before discussing
taking measurements.
Mounting:
There
are three basic mounting
options, and each one has a picture below to illustrate what I am
writing. All three options assume that the stained glass will be
mounted on the interior side of the clear glass WITHOUT REMOVING THE
EXISTING GLASS. This has the advantages of [1] allowing me to produce a
cleaner looking window, [2] reducing the cost since I usually won't
have to weatherproof (putty) the stained glass pane, [3] saving you or
I the
sometimes impossible but generally difficult task of removing the
existing clear glass, and [4] allowing you to remove the stained or
beveled glass in the future should that ever be a desirable option.
Option
#1
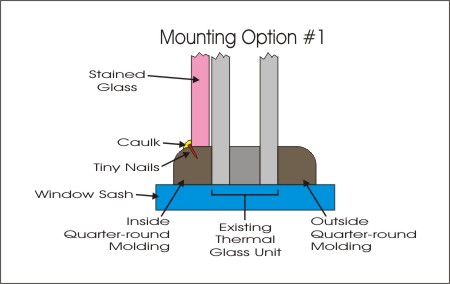
Here,
there is a quarter-round molding on the inside onto which the stained
glass panel will be mounted. The illustration above shows the inside
molding
on which the stained glass rests to
be wider than the thickness of the stained glass panel, but this is not
always the case, nor is it always necessary. There only needs to be
enough of
a lip for the
stained glass panel to sit on, and that lip could be less than the 1/4
inch depth of the stained glass panel.
The
stained glass sits on the quarter-round molding and is held in place
with brads - tiny finishing nails - spaced about every 4 to 6 inches
around the entire outside edge of the panel. A bead of caulk is then
applied around the entire edge of the stained glass panel to block out
any light coming in around the edge of the panel. Use white caulk for
white window sashes, some shade of brown caulk to match a wood color,
or a caulk call "dark bronze" to match the dark metal window sashes
used today on many windows in commercial settings. Be careful to apply
the caulk sparingly and carefully - especially the non-white colors -
as a messy application can be difficult to clean up.
It is easy to
see where the
measurements will need to be taken for Mounting Option #1.
Option
#2
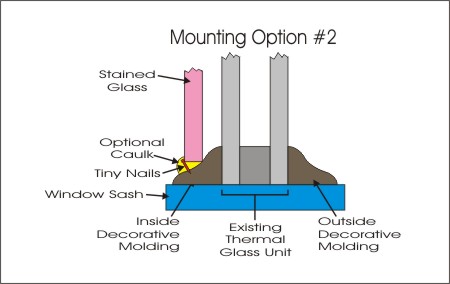
Here,
a decorative molding is used on the inside of the existing window. The
stained glass panel will be mounted in the "dip" of the molding. It may
be a lip-like dip, or just a smooth depression in the molding, as
shown in the illustration above.
The
panel[s] are held in with brads, just as in Mounting Option #1. But
unlike Option #1, the bead of caulk is optional in this type of
mounting because the stained glass panel and the molding will overlap.
This means that if you mount the stained glass tightly and precisely,
no light should come in around the stained glass panel. You could still
choose to use a bead of caulk with Option #2 if the panel does not fit
tightly enough and light still peeks in around the stained glass panel,
or if you simply think that it will look better to fill the slight gap
between the stained glass panel and the decorative molding. This
decision will probably depend on the shape of your decorative molding,
so I would mount the panel[s] first and then decide if a bead of caulk
is necessary. If so, use the info about caulk spelled out in Option #1
to select the right color and to apply it correctly.
Measurements
for this type of mounting are a bit tricky, but simply decide where the
stained glass will likely "sit" on the molding and measure the openings
out to that point.
Option
#3
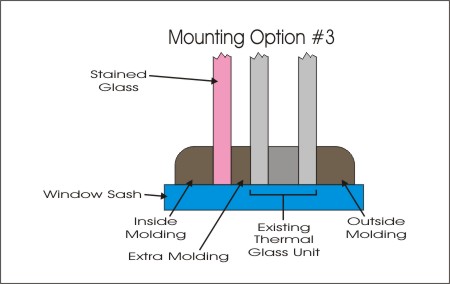
This
mounting option is usually employed [1] if the window is not
yet
built when the inclusion of stained or beveled glass is decided
upon, [2] if a change to the existing window is called for,
allowing a new mounting area to be created, or [3] if there is
enough depth to the window sash so that you can set the stained glass
panel on the sash and still have room to reset the inside molding.
Here the contractor who is bulding the window makes a third molding
that will separate the stained glass from the clear glass. Although I
have shown a quatrer-round molding in the illustration, any molding
type is ok as long as the one separateing the stained glass from the
clear glass is a simple rectangular molding. One last option here is
where the "extra" molding would be a sticky mounting tape rather than a
molding made of wood. This last option may be easier to accomplish, or
it may be adviseable if the depth of the sash on the inside is minimal.
The
usual caulking is done to the clear glass, but the stained glass should
need no additional caulking. If you are having this type of mounting
done, have your contractor fully install and "finish" the middle
molding with stain or paint to match the inner and outer moldings. The
interior moldings should also be made and finished, but not fully
installed, as you will install them after you have mounted the stained
glass.
Measurements
here should be made of the full opening size, or your contractor can
provide you the sizes that were used for the clear glass units.
Once the proper
mounting option
is
selected, use the following information for taking accurate
measurements.
Taking
Measurements:
Sizes can be
approximate during
the
design phase, but if you are off by an inch or more, the final sizes
could change the price I have quoted you. It's best to measure the full
size of the openings as accurately as you can. If you are planning any
changes to the window - such as replacing an opening window with a
one-piece non-opening window, those changes MUST happen before you take
measurements.
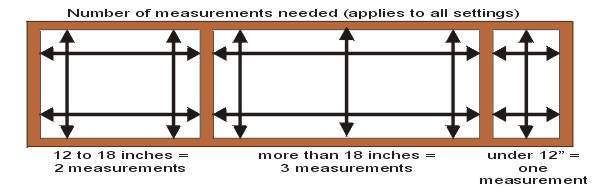
- Final measurements will need
to be to the
nearest 1/16th",
so if you can manage to do that at the start, it will save you the
trouble of re-measuring later on. However, approximate measurements are
fine too, especially where final measurements are difficult to take
such as in windows that are located high up or windows that aren't
built yet. Also, where the side of a
panel is more than 12", multiple measurements will need to be taken, as
the openings are often not a true rectangle (clarified in the third
illustration below). If you're giving me approximate measurements, one
measurement per direction will suffice).
- For hanging artworks that will not fill
an entire opening
or window, give me the full size of the opening or window as well as
the size you think you want the artwork to be. This way, I can comment
on how I think the proposed size will fit aesthetically into the window
or opening and whether I think it should be hung centered or
off-center.
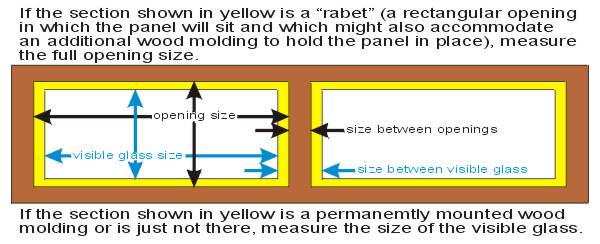
- For artworks that will fill an entire
window or opening,
either [1] measure the full opening and tell me that this is the full
size of the opening, OR [2] measure the size of the visible glass and
tell me that this is what you have done.
- If there are multiple openings that make
up a single
artwork or setting, measure the spaces between the openings or between
each of the visible glass panels.
The
following drawings may help to clarify taking measurements. The
important part is to convey to me what you have done. For example, tell
me what mounting option you think will work best for you, and what
measurements you are giving me as a result. If you take "opening size"
measurements, make sure that I know that. Or, if you are taking
"visible glass size" measurements, be sure to tell me that.
In
the next illustration, all measurements near the end of a side should
be taken within 1 - 2 inches from that end (even though it may appear
not to be the case in this drawing). Also, these same rules apply to
horizontal and vertical measurements. When you give me multiple
measurements, be sure that I will be able to correctly understand what
you are giving me. For instance, write something like, "The vertical
opening size measurements for Panel number 1 are LEFT: 18 and 1/16
inches, CENTER: 18 and 2/16 inches, and RIGHT: 18 and 1/16 inches, and
the horrizontal opening size measurements are..."
2)
Do you want the design to depict something (a representational design)
or not (a non-representational design)? Examples of representational
designs would be flowers, animals, people, scenery, a family crest, a
favorite sport, a cultural event or icon, a company logo, etc. A
non-representational design would be a "pure" design in a style such as
art nouveau, art deco, southwestern, country French, prairie style,
mission style, etc.
3)
How much privacy do you need to achieve in these windows? Complete
privacy,
partial privacy, or none at all may be required. When thinking about
privacy, you should know that color and privacy are totally independent
of one another. keep this in mind as you read Item #5 (below) on
whether or not to use colored glasses and, if so, how much color to
use. Privacy can be achieved with any amount of color - even when using
no color at all.
4)How
much
daylight do you want to come through the artwork? Some glasses
reduce the light coming in quite a lot; other glasses reduce the light
very little or not at all. Is this a place where you want lots of
daylight so you never have to turn on interior lights during the day?
Or, is this a place where you need to reduce daylight significantly
without having to open and close blinds twice a day? As
stated
above, the amount of light that comes through is independent of the
privacy required. Some
glasses such as
textured clear
glasses (used in Clearly Abstract
or Bevels w/ Blue)
allow
all the light to come in, but provide varying degrees of privacy from
partial privacy to complete privacy. Glasses that reduce the amount of
light coming in also provide privacy. An example of light-reducing
stained glass can be seen here.
5)How
much
color or lack of color do you want? Artworks can have any amount of
color from totally colored glasses to totally clear glasses, or any
combination in between those extremes. How much color will
look best for the setting you have in mind? Do you want the light
coming in to be "white light," in other words, uncolored light? Too
much colored glass (especially bright colors) can sometimes give the
interior space a church-like feeling, coloring the walls (especially
white walls) too much. One very popular solution to this is to use some
amount of textured clear glass, such as the main background glass, and
use colored glasses sparingly or use glasses with muted colors. This is
not to say that glass artworks cannot be mostly (or totally) colored
glasses. It just means that these are the considerations that come into
play when deciding on an art glass look. There are also many soft
colors, pale colors, and neutral colors available in glass. I try, in
all cases, to take
in what the client wants and find a way to accomplish their desires in
an elegant and tasteful way. Stained or beveled glass art can even be
completely colorless, using all textured clear glasses (with or without
beveled glass). See my gallery
page for examples of all of these variations, from colorless to some
color to a lot of color to completely colored.
6)
Do you want to match anything? Many aspects of the
environment can be incorporated into the artwork, including the
architectural style, interior design style, wallpaper, tile, fabrics,
color scheme, outdoor landscaping, etc.
7)
Where
and how will the artwork be mounted? Hanging pieces come ready to hang
with plenty of braided wire and eye hooks to mount into the top of your
window's sash (larger/longer hooks may need to be purchased if the
window sash is plaster or wallboard... the crucial aspect is to insure
that the threads on the screw part of the hooks get up through the
plaster or wallboard and into something solid [usually wood] above).
Artworks
that fill an entire space are mounted in a more permanent fashion.
Mounting in an interior transom or on opening in a wall or above a
half-wall (that is, all settings that are not in an actual window to
the outside environment) pose no special problems, and
mounting can be achieved in almost any manner that the client wishes.
Mounting
stained or beveled glass panels in a window to the outside environment
brings up the question of whether or not to remove the
existing glass.<
/b>
8)
What do you wish to spend?
Although some people object to telling me this up front (before they
get a quote from me), it can be VERY helpful information. Knowing what
you wish to spend helps me to suggest ideas in your price range that
will be unique, elegant, and able to achieve your other functional and
artistic desires. Although I prefer to have a rough idea of the
acceptable price range before beginning to create designs, I am also
comfortable working with clients who would rather I give them a more
"spontaneous" price quote after gathering as much other relevant info
as possible.
9)
Where do you live? I can't give
you an accurate quote without knowing if you are local to me and I will
be installing the artworks myself, or you live somewhere far from me
and I will need to get an accurate quote from my shipper. I cannot give an accurate quote without a
zip code!
The
Design
Phase:
Once
we have begun to
answer these
questions, you must decide if you like the mental picture I am painting
of what I will make for you in exchange for the ballpark price that I
am quoting you. If so, your saying "okay, let's proceed" will send me
to my computer to design one or more exact scale drawings of the ideas
that we have discussed. I do not charge an up-front design fee
for small to average sized commissions. I need only your
sincere verbal commitment that I am the "chosen artist" before I will
invest my time in the design of your project. I charge a design fee up
front if the commission is large or complex. In that case, I would
quote you the exact design fee, which you would pay prior to
my beginning the design phase. This fee would be subtracted from the
final price quoted for the project.
(This
seems like a good time to remind you
that EVERY DESIGN I SHOW A CLIENT IS MY COPYRIGHTED POSSESSION AND MAY
NOT BE SHOWN TO ANY OTHER GLASS ARTISTS OR STUDIOS WITHOUT MY EXPLICIT
CONSENT.)
I
design on my computer,
allowing
me to post your design[s] to a private web page where you can go and
see them. The design process includes making changes to the drawings
(or producing new designs depicting altogether new ideas) until you are
totally satisfied with the "final" designs. Each design will always be
accompanied by an exact price and a description of the particulars
relating to that design (bevels, other options, etc.). For
commissions near Denver, delivery and installation would be included in
the prices quoted. For commissions not near Denver, all quotes would
include either [1] remote delivery and installation [that is, installed
by me], or [2] shipping to your location [and installation by you or by
some professional contractor or glazer near you]. On
any project where I am not the installer, I will always be willing to
consult
about the installation with you or whomever will be doing the
installation.
Once a
design is
selected as
"final" (that is, no more revisions are necessary), we would
concentrate on the selection of the glasses (colors and textures).
While many clients trust me to choose that actual glasses [after we
have fully discussed their wants and desires in that area], I could
send you samples to choose from, or direct you to a local glass
wholesaler or retailer so that you can see larger examples of available
colors and textures. At that point, I would also look at my schedule
and give you an accurate time estimate for completing the commission.
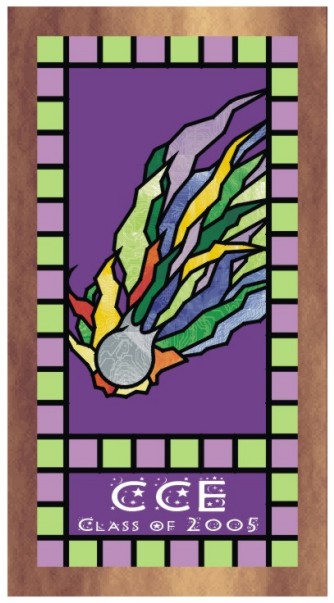
Just
below is a sample design I did recently for a client who found
me
on the internet. She was authorized to act on behalf of a kindergarten
class somewhere in the midwest, and they had $500.00 to spend. Their
school emblem is a comet, but they only had some too-simplistic clipart
to copy. So, we opted for an artistic and colorful comet that I
would design. I also had to incorporate the school colors,
which
were green and purple, and the artwork had to have some appropriate
lettering that she sent me:
This
design is also an example of something I get asked to do often: LETTERING.
Corporate incentives, wall art installations, personalized
gifts, company logos, religious art... these are all examples of the
many stained glass
projects that might require lettering. Lettering can be done four
ways, each with its own advantages and disadvantages. They are:
- Option
1 - Doing the letters
in pieces of glass. Examples of my
work showing this can
be seen here-1
or here-2
or here-3.
This is the most expensive way to do lettering because it is the
most labor-intensive. It also has the
drawback of having to break up the background pieces of glass into
shapes that can be cut, resulting in additional leadlines that can
sometimes overpower the
look of the lettering. This is not usually a problem with large
lettering or with most of the simpler fonts, but it can be difficult to
do well - and therefore expensive - in artworks that are small, in
artworks where the letters themselves are small, and in artworks where
the font is complex or script-like. The situations I just
listed can even make it impossible to do the lettering this way,
or price it out of the client's budget, or produce lettering that would
not be effective because of limited read-ability caused by the letters
themselves or the need for too many background lines.
- Option
2 - Sandblasting the
letters into flash glass. Examples
of my work showing
this can be seen here-1 or here-2.
Flash glass is two thin layers of glass fused together into a single
sheet of glass.
Most often the two layers are one colored layer and one clear or white
layer. By sandblasting through one layer, the other layer can be seen.
For example, the word "Porsche" seen at the link above uses a
red-on-clear flash
glass. This method has the advantages of being permanent like
Option 1, and that more fonts than Option 1 can be done with
this
method. It is also less expensive than Option 1, but not much so.
- Option
3 - Using a sign shop
to cut the letters from sticky vinyl.
Examples of my work showing
this can be seen here-1 or here-2
or here-3
or here-4
or here-5. I
am doing more and more of this, and I am recommending it for more
and more projects because its use has been so successful. It's great
for small
artworks because fine detail is possible without background leadlines
overpowering the look of the lettering. Two other advantages are that
almost all fonts are possible and that the lettering can be done in
many colors besides black. This kind of lettering is
not totally permanent, which is a drawback to some and a plus to
others. Sure... you want it to be "permanent" for the next 60 years,
but after that who will really want to own a stained glass artwork
that thanks Great Great Great Uncle Harry for a job well done? Vinyl
lettering could
stay on for
60 years, and then it could be removed, giving new life to a beautiful
stained glass artwork that no
longer thanks what's-his-name. Or, it could be ideal for a
sign in a shop that might not stay in business forever. Then,
too, it could function in a new way after serving its original purpose.
The drawing of the comet, above, utilizes vinyl lettering. In
this situation, where the budget
constraints of the kindergarten class ruled out the other possible
options, the need for lettering could only
have been done with this option.
- Option
4 - Using kiln-fired
glass paints. An example of my
work showing
this can be seen here.
This is the method that goes back a thousand years in the history of
stained glass. The advantage is that this type of lettering is totally
permanent. The paints used are made of ground glass, and the firing
process fuses the paint with the glass. The disadvantages are that this
method is labor intensive and therfore costly, and that the look can
only be as good as the skill of the person who does the painting. I
rarely use this method, but am totally capable of using it when it is
the right choice.
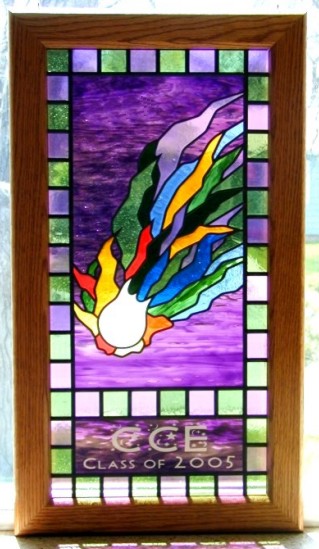
Here is the
photo of the
completed
comet artwork, including the custom
design, the school colors, the frame, and the lettering.
The
Contract
Phase:
Before
beginning the project, I
would submit a final drawing or invoice that would state all of the
glasses chosen, specialty options to be included, and the methods of
construction to be used. Also included would be the date of completion,
the method of delivery and/or installation, any applicable taxes, and
the terms of payment. This final document, once signed by both the
client and myself, would serve as a binding contract, protecting the
interests of both parties. For relatively small commissions, the web
page where I have posted designs for the client to review usually
serves as the "contract", and we proceed with mutual trust rather than
a signed formal contract. Anyone not comfortable with this has only to
request a signed contract, and I will gladly comply.
PAYMENT OPTIONS
I accept checks
and credit card
payments. Checks take a little longer as I will not ship an artwork
until the final payment by check has been fully processed by my bank.
Credit card payments go through PAYPAL, and cost 3% more (so that
clients who pay by check are not charged for this service, which they
aren't using).
- Near Denver, CO:
Installed by me:
50% down - the balance upon installation
Not installed by me:
50% down - the balance upon delivery by me or
pick-up by the client.
- Not Near Denver:
Installed by me:
50% down - the balance upon
installation
Not installed by me:
50% down - the balance just
prior to shipping the artwork(s)
In the
situation where artworks are shipped, I submit one or more photos of
the completed artwork to the clients, allowing
them to see that the work has, indeed, been completed as per our
contract. Once I receive their final payment, I ship the artwork(s)
immediately (insured, of course). The only time the terms of payment
would vary from the above is when a commission is very large and would
warrant multiple interim payments. In that case, the terms would be
spelled out completely in a more detailed written contract that would
be
signed by both parties.
You can go here to
see an example of a private web page I created for a client. She wanted
a free-hanging
artwork depicting her show horse named "Time to Dream." For this
particular project, the client chose sandblasted lettering.
You will see this web page contains the initial drawings I did from her
input, the
terms of our contract, and a photo of the completed artwork
that I
added to the page after I had completed the artwork. Once she saw that
the
artwork had been completed, she sent me the final payment. Upon
receiving the final payment, I immediately shipped the artwork to her
(well crated and insured, of course). Nowadays, I also
offer credit card or bank transfer payments through
PAYPAL,
an immediate
payment option with guaranteed security (no PayPal account is
necessary). This option costs 3% more as I
don't think it's right to figure it into all of my prices when some
people pay by check and so should not be charged for that service.
Remember:
If you intend to get quotes from
glass artists or studios who live in your area or from other glass
artists or studios on the internet (other than myself), proceed
carefully! There are a lot of studios and
individuals who produce poor craftsmanship and/or who only "borrow"
design ideas from books and other non-original sources. Usually, for
the same amount of money spent, you can get an artist or studio who
develops original designs and produces precision-crafted artworks. You
just have to spend a bit more time interviewing and choosing (from an
educated place) the artist or studio that will create your artworks. I,
for instance, offer only my own original designs and my craftsmanship
is the very highest quality. The craftsmanship is a
particularly essential aspect to be aware of. Poorly crafted glass may
start to show structural problems within a few years. Well-crafted work
should last almost indefinitely with no structural problems. Poor
craftsmanship also looks sloppy and disjointed up close. Well-crafted
work looks clean and precise. See my Craftsmanship
Page to get the
quick education you will need in order to tell good craftsmanship from
bad.
So there you have it... Feel free
to contact me when you
want to discuss further the wondrous
possibilities of a custom designed artwork. I am also happy to answer
questions that
I may not have answered adequately here. I welcome and reply to all
those who contact me.
NEW! See photos showing the process of making a stained glass window here. |


