Stained Glass
Craftsmanship
How to tell
the Good from the Bad

Visitors
have my permission to print this page, to do so, click here.
The
ultimate goal of the fine craftsperson, like the fine artist,
is to create something that will captivate, evoke, enthrall, or in some
other way stimulate the viewer. This is accomplished by coming up with
fresh ideas or designs, and then executing them with a precise control
over the medium (even though the outcome may look quite random and/or
imprecise). In any artistic medium there is an art
to designing projects, and a craft to bringing off
that aim at the highest level. There is an art to designing a stained
glass window, just as there is a craft to laying down paint on a
canvas. Stained glass, throughout its history, has been elevated to the
realm of fine art and plunged into the obscurity of everyday
architectural decoration. Currently, its reputation resides somewhere
between these two extremes, having almost limitless potential to
compete with other forms of fine art and fine craft, yet being kept
from doing so in large part because of many non-professionals
(hobbyists) seeking a vocation in either making or teaching stained
glass, and thus diluting the medium with shoddy craftsmanship and
non-original design.
Fine
craft refers to
the best that can be
achieved within any craft medium, and is invariably a balance between
artistic expression and superlative technique. I have, for a long time,
been sad and disappointed that so much of the stained glass I see
is
poorly designed or poorly crafted. I do not mean to imply that
there is no good stained glass about, only that it seems to be a
pyramid with some at the top both well designed and well crafted, and a
lot more below missing one or both of those qualities. And while every
medium has its place
for fledgling artisans who are still struggling with becoming good at
either the design process or the craft itself, not every medium has
been swamped with so many "professionals" who are in
business long before they have mastered the craft. It is my hope to be
of help to both consumers and stained glass artists
when I speak out about the need for a higher standard of design and
craftsmanship in this medium as a whole. I hope that stained glass will
once again be revered for its true artistic potential, that its
reputation will be raised to the level of other
forms of glass art, and that it will be shown as glass art in
appropriate art galleries along with other forms of glass, rather than
relegated to the gift shop.
If
you're thinking of having a stained glass or beveled glass artwork
made, you may be seeking out glass artists on the Internet or getting
quotes from artists or studios that are in your locality. Whatever you
do, proceed carefully! The two major pitfalls
you'll want to be on the lookout for are poor craftsmanship
and poor design! There are a lot of stained
glass studios and
individual stained glass artists whose craftsmanship ranges between
just fair
and poor, and too many who do not even try to come up with original
designs. Remember that the best
quality work is [1] innovative and original in design, and [2] crafted
cleanly and precisely. I won't speak further about original design here
because good design is purely subjective and each of us knows what she
or he likes. Craftsmanship, however, can be assessed and rated using
objective criteria, thus allowing the consumer to learn what to look
for. This page is designed to alert you to some of the pitfalls of poor
craftsmanship and to educate you concerning what good craftsmanship
looks like.
This
page is also a
good source
of information for people wanting to select a good teacher of stained
glass. Use these same standards when interviewing someone you may be
considering paying to learn from. Try to find a teacher who
will
inspire you to create original design as well as teach you how to
create impressive artworks. If you can't find a good teacher in your
area, you may want to read about the stained glass class
I offer on DVD.
Here
we go...
Precision
craftsmanship in stained glass is a necessary part of of this medium.
Poorly crafted stained glass may start to show structural problems in
as little as a few years. Well-crafted work should last many decades
with no structural problems. If you've ever seen windows in churches or
restaurants that have begun to "sag" (bow out of shape) or separate
(light coming through where it should not), you've seen the results of
time and gravity working on poor craftsmanship. Poor craftsmanship also
looks imprecise, sloppy, and disjointed up close. Well crafted stained
or beveled glass looks clean and precise.
Good
craftsmanship is a product of two things, attitude and practice. The
fine craftsperson has an attitude that settles for nothing less than
perfection, and is willing to develop and/or continually refine his or
her techniques toward that end. With this attitude firmly in place,
it's just a matter of endless practice. The consumer should be wary of
hobbyists who set themselves up as "professionals" after only a few
months or years of working in the medium. Everyone has the right to go
into the business of craft, but the savvy consumer will soon realize
that they are free to interview and choose who will craft the artworks
that they will pay good money for and be stuck with for a long time.
P.S.
The best craftspeople usually charge about the same as everyone else,
or in any case very little more. Also, they will rarely take on a
challenge that is clearly beyond their
abilities as I have witnessed some poor craftspeople do.
The
following are descriptions of what to look for...
In
Copper Foiled Windows, Lamps, and Artworks:
Copper
foil is one
method for holding the glass securely in place. It entails surrounding
each piece of glass separately with copper foil - a pure copper tape
that's sticky on one side - then soldering over all of the copper foil
to "weld" together the structure that securely holds the pieces of
glass. The sticky side of the copper foil tape is pressed to the glass,
and the excess tape that sticks out above and below the upper and lower
surfaces of the glass is bent down onto those surfaces, forming the
"channel" that holds the glass.
Copper foil tape
comes in a variety of widths, allowing for more or less "overhang,"
which translates into a deeper or shallower channel and appears in the
final artwork as a thicker or thinner leadline (Note: the lines between
adjacent pieces of glass are referred to as leadlines
regardless of whether we're talking about the lead or the copper foil
method of holding the glass pieces together.) Because each piece of
glass is surrounded with copper foil separately,
all of the copper must be covered with a "bead" of solder, i.e., the
entire leadline is covered, front and back, with solder (no copper shows). If there are
gaps between one piece of glass and the next (due to imprecise cutting
of the glass), these gaps become filled with solder, too, resulting in
leadlines that are thicker than where the glass pieces fit precisely
next to one another. Although some amount of variation in the width of
the leadlines can add a positive artistic effect (such as with flowers,
birds and such), too much variation is a sign of poor cutting of the
glass and is especially detracting with geometric shapes, straight
lines, etc.
Having mastered both construction methods,
lead and copper foil, I choose which to use based on the size of the
project, the design, and which method will look the best artistically.
As such, I choose lead far more often that copper foil. Still, there
are times when foil is the best choice, such as [1] when very thin
leadlines are required or [2] when the shapes of the pieces of glass
would make using lead came impossible.
Here is
a list of
what to look for in a well crafted piece of
copper foiled stained glass.
1)
The copper foil "leadlines" display a uniformity of width.
As per the discussion of the copper foil method above, precision
cutting of the glass and precision laying down of the foil onto the
glass has resulted in leadlines that [1] vary only slightly in width
throughout the artwork as a whole, and [2] show almost no variance in
width from one end to the other of any single leadline. When assessing
the level of craftsmanship of a stained or beveled glass artwork that
has been copper foiled, look closely at straight lines and simple
geometric shapes such as circles, rectangles, ovals, paisleys, etc.
Straight lines should be perfectly straight and show almost no variance
in leadline width... curves should be smoothly curved... circles should
be perfectly circular, and the variance between the thinnest and the
thickest leadlines should be minimal unless the artist has obviously
chosen to create different widths for artistic effect (if you have any
doubt about whether it was the artist's intention to utilize different
leadline widths or simply a lack of skill on his or her part, ask to
see other artworks).
2)
The presence of very thin leadlines (as well as thick ones).
One of the biggest advantages of using copper foil over lead as a
method of holding the glass is that with copper foil the artisan can
create very thin leadlines (Lead has its advantages, too, which will be
explained farther down on this page). The smallest lead commercially
available gives a leadline that is uniformly 1/8th of an inch wide.
Copper foil can give leadlines that are much thinner than 1/8th inch.
Achieving very thin copper foiled leadlines requires both precision
cutting of the glass and precision laying down of the copper foil onto
the glass using a copper tape that is only slightly wider than the
thickness of the glass. If an artist shows you a piece that has only
relatively thick leadlines (which is only necessary
in artworks that are very large in size and very simple in design), ask
to see other works with thinner copper foiled leadlines.
3)
A solder bead that is smooth, especially [a] on long uninterrupted
copper foiled leadlines and [b] where two or more leadlines meet.
This may not apply where the artist has meant to
add some decorative soldering. However, beware of artisans claiming
that poor soldering is "meant to be decorative"... once you've seen a
good example of smooth soldering, you'll soon learn to tell the
difference. When in doubt, ask to see other artworks.
4)
A uniform appearance of the patina (if one is applied).
This is a chemical solution that turns the dull-silver colored solder
to a copper, brass, green, or charcoal gray color (the last is my
favorite, artistically). Poor craftsmanship here appears as a blotchy
or uneven look in the coloration of the leadlines, and probably results
from insufficient cleaning of the artwork prior to the application of
the patina or a poor method of applying the patina itself.
5)
There are no copper foil "ends" showing. Since
the copper foil tape is applied to the entire edge of each piece of
glass, it must slightly overlap itself where it begins and ends its
circumnavigation of each piece of glass. The absence of visible
ends means that the copper foil is exactly
lined up where this overlap occurs. The presence of visible ends is a
sure sign of hurried craftsmanship. These can occur anywhere along the
leadlines, as well as at the corners of a piece of glass.
6)
There is no "backside" showing. If the foil is
applied to the glass imprecisely, there will be places where more foil
was flattened onto the underside of the glass (which becomes the back
side of the artwork) than onto the topside of the glass (which becomes
the front of the artwork). This allows the "backside" of the foil to
show through on the front of the artwork, especially where clear or
light colored glasses are used. This is readily noticeable because the
"backside" is a bright copper color and shows up readily against the
front of the leadlines, which have been covered with solder and maybe
patina-ed, and therefore are no longer copper colored. Some artisans
trim away this overhanging copper foil with a razor knife, which is
okay, but time-consuming. I have developed my own technique whereby I
foil every piece slightly more onto the topside than the underside of
the glass, preventing the need for trimming and ensuring no "backside"
showing through. (Will any artisan about to adopt this technique please
send me $5 for all the time and effort I've just saved you... wink,
wink.)
The
following are descriptions of what to look for...
In
Leaded Glass Windows, Lamps, and Artworks:
Lead is the other
method of holding the glass securely in place. Leading requires more
skill than copper foil since the pieces of glass and lead are fitted
tightly together before beginning the soldering phase (as opposed to
copper foiled pieces of glass, which are loose
until the soldering phase is begun). Lead came
is a pre-formed miniature I-beam of pure lead, a very soft metal that
can be bent to follow the contours of the glass. The lead I-beam has
two channels (channel one=>I<=channel two) in
which the adjacent glass pieces are fitted. Lead requires soldering
where one piece of lead touches another piece of lead, unlike copper
foil, which must be soldered along the whole
leadline. Lead, like copper foil, comes in different sizes. However,
since the smallest commercially available lead is 1/8th of an inch
wide, one can achieve thinner leadlines with copper
foil than with lead. The major advantages of using lead over copper
foil are [1] that leaded leadlines are perfectlyuniform
in width, which looks especially good with straight lines,
geometric shapes, and symmetrical designs, [2] that leading, once
mastered, is much quicker than copper foiling, and can therefore
significantly reduce the cost of a stained glass artwork, and [3] that
lead can achieve some artistic additions that copper foil cannot (the
primary one being the use of different sizes of lead, which adds
greatly to many stained glass designs). Leading
requires greater glass-cutting skill because gaps between one piece of
glass and another are not filled with solder as they are in the copper
foil method (this is why almost all stained glass classes teach copper
foiling before they teach leading, and many do not teach the use of
lead came at
all). When the gap between two adjacent pieces of glass becomes large
enough, it will not be hidden by the channel of the lead came, and the
raw edge of the glass will be visible to the viewer. Most of the time
these flaws are not large enough to be visible, that is, the gap
between the glass and the lead is still hidden by the lead channel.
Additionally, these gaps are almost always hidden by the final stage of
leading, applying the putty (puttying is not necessary with copper
foil).
Leaded artworks generally have a special
putty forced into the channels of the lead
came. This was more necessary when stained glass was the only glass
between inside and outside, which is rare anymore. Although putty
is
necessary to
create an airtight, weatherproof artwork, not all stained glass done in
lead needs to be puttied. Putty is not required in a
well-crafted artwork that is mounted in an interior setting, and so does
not need to be airtight or waterproof. The goal is to be visually tight rather than
airtight.
Puttying a stained
or beveled glass artwork can be a way of hiding imprecise glass cutting
or poor leading technique. Hidden, putty-filled gaps are the
primary source of structural problems that occur after a few years.
Gravity and changes in atmospheric conditions work relentlessly on the
artwork, causing the putty to shift, crack, and crumble on a
microscopic level, leading to visible bowing, sagging, and/or
separating in the artwork. This is why precise technique throughout the
leading process, resulting in glass butted up firmly and precisely to
lead butted up firmly and precisely to the next piece of glass, is so
crucial to the lifespan of the artwork.
Another obstacle
in mastering the method of leading is learning to cut the lead
accurately. Fortunately, imprecise cutting of the lead came is more
noticeable than the putty-hidden gaps resulting from imprecise cutting
of the glass. For that reason, we will focus more on imprecise leading
than on imprecise glass cutting in discussing what to look for in a
well crafted leaded artwork, since the average consumer never sees the
project until after the puttying process has hidden flaws of that sort,
if any exist. However, it is generally safe to assume that imprecise
cutting of the lead may be indicative of bad craftsmanship in general,
and that it may suggest the presence of imprecise cutting of the glass
as well.
Here is what to
look for in a well crafted piece of leaded
stained glass or beveled glass.
1)
Straight leadlines are perfectly straight and curved leadlines are
smooth and precise. Since the lead came is bent
to follow the edge of the glass, it can't be any more precise than the
edge of the glass that it is shaped to. Straight lines or curved lines
that "wobble" may indicate poor drafting abilities (i.e., poor
mechanical drawing skills), poor glass cutting ability, and/or poor
leading technique. Look closely at straight leadlines. Are they
perfectly straight? Look closely at curved leadlines, especially a
circle if one is present. Are the curved lines smoothly
curved? Are the circles really true circles? In a
well crafted stained or beveled glass artwork, they will look precise.
Where they are not precise, hurried or lazy attitudes flourish.
2)
Solder joints are smooth and relatively small.
In other words, there are no long "arms" of solder trailing down one or
more of the leadlines adjacent to a solder joint, and the joints are
smooth in appearance. Don't let someone tell you long trailing arems of
solder are done on purpose to add strength to the piece. While it may
be done on purpose, it adds almost nothing to the strength of the
artwork, and is often the sign of a craftsperson who [a] has yet to
perfect her or his soldering technique, or [b] has a lazy or hurried
attitude. This is not to be confused with an artisan who chooses to
cover all of the leadlines with solder. Some think
this gives a more uniform look (whether patina is applied or not). I
think good soldering and good patina techniques make this unnecessary,
but it is not necessarily a sign of poor craftsmanship. When in doubt,
ask to see other artworks.
3)
Where two leadlines cross each other, they match up both
ways. Where there is imprecise cutting of the
glass or lack of skill in constructing the leaded artwork (i.e.,
fitting the pieces of lead and glass together prior to soldering),
there is often the case where one leadline "matches" (the one that is
actually a single, or uncut, piece of lead) and the other doesn't
"match" (the one that is actually two pieces of lead meeting at the
single [uncut] piece of lead). Look for this as a sign of poor
craftsmanship in all leaded pieces, but especially in pieces with lots
of adjacent rectangles (such as in the border designs of many leaded
glass artworks) or in artworks with lots of straight lines. Precise
matching is even more difficult where the leadlines cross at angles
other than 90 degrees, such as in a tight-fitting pattern of diamonds.
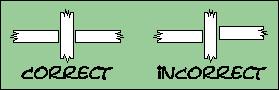
See the figure below for the simplest of cases, where lines are meant
to cross at 90 degrees.
4)
Where two leadlines are meant to merge into one line, the juncture is
visually smooth. Inability to cut a fine point
on the lead came will result in a juncture that seems to have a "jag"
in it, somewhat similar to what is seen with improperly aligned "ends"
in the copper foil method. Some artisans try to cover this type of gap
with solder, which is fine if they are skilled with a soldering iron.
Unfortunately, the inability to cut a fine point on the lead is often
coupled with a lack of soldering expertise, resulting in a choppy or
jagged look upon close inspection (see the figure immediately below).
Skilled craftspeople spend no more time (in fact, probably less)
creating an artwork free of jags and gaps. That's why they can charge
the same price for a well crafted artwork as poor craftspeople charge
for a poorly crafted artwork.

5)
Where the design includes finely pointed pieces of glass (possibly a
mark of good design and craftsmanship in itself), there are no "jags"
in the leading. This is similar to number 4,
above, but I just wanted you to be aware of looking for it where one
leadline meets another at a sharp point, regardless of whether the two
leadlines were meant to merge into one or not. Some unskilled
craftspeople try to avoid designs altogether that have sharply pointed
pieces of glass in them.
6)
Where putty has been applied, excess putty has been removed as much as
possible. When an artwork is puttied, both
surfaces (front and back) are completely covered with the soft putty.
Then, the putty is forced into the channels of the lead came,
usually with a stiff brush. Finally, after the proper amount of drying
time, the excess putty is removed by a number of methods. Not removing
enough putty causes the leadlines to look wider than is necessary and
to vary in width, defeating the elegance of the precise uniformity of
line width that is the hallmark of leaded artworks. It also makes
corners look less sharp and pointed pieces look less pointed. Finally,
not removing enough putty makes the artwork look less clean, overall.
Too much putty on an artwork is a sign of bad attitude (laziness)
and/or gaps from imprecise glass cutting that may have needed to be
hidden from view.
Note: I started #6
by writing, "Where putty has been applied..." because no
putty is required where the leaded artwork doesn't need to be airtight
or weatherproof (such as an artwork that is meant to hang or be mounted
in an existing window), and where no gaps need to be hidden. This is
the case in many of the artworks that I create.
7)
Where patina is applied, it looks uniform. See
the item about patina in the copper foil section above for an
explanation of this.
Note: Since applying
patina to an artwork
requires
dousing the artwork with the liquid patina, this is usually done to
artworks that have not been puttied.
A
few additional things to look for and ask about:
1)
Studios or individual stained glass artists who never use lead (they
only use copper foil).
Some studios or individuals use copper foil on all projects. This is a
red flag, in my opinion (not proof of poor craftsmanship, but worthy of
further inquiry). This is often because almost all classes in stained
glass teach copper foil first... it's easier for the student to do her
or his first projects in copper foil, which is more "forgiving"
concerning
the imprecision of the novice craftsperson (filling the gaps with
solder, etc.). Unfortunately, many craftspeople try leading and give up
on it because of the added difficulty inherent in the construction or
fitting process and the greater glass-cutting precision required to
make an artwork that will look good. While it does take more time,
patience, attitude, and practice to learn the skill of leading, I think
that it is a necessary part of becoming a professional in this medium.
This is because all large residential, commercial, and liturgical
stained or beveled glass panels should (in my opinion) be leaded.
Copper foil should be used for large panels (about 4 square feet or
greater) only where the design is very intricate (sometimes) or where
the design contains spaces that are supposed to be filled with solder
(an example is where small circles or glass nodules are bordered by
straight lines).
When interviewing
a studio or individual stained glass artist, always ask to see examples
of both leaded and copper foiled artworks. If no leaded artworks are
available, ask why. If the answer is that they don't do leading, ask
why not. Combine that with the information presented here and you will
know whether this is the artist or studio you want to pay to design and
fabricate the artworks that will become a part of your home, office, or
religious environment for a very long time.
The
one thing I detest most in stained glass is when I see copper foiled
artworks that contain beveled glass. Bevels, being 99.9%
symmetrical in design, should NEVER be copper foiled. NEVER! And doing
so is UGLY UGLY UGLY! Unfortunately, this happens a lot because (as
explained above) many people either never even tried learning the use
of lead came or gave it up because copper foil was easier. But any
master of this craft and EVERY professional who exchanges their work
for money should know both lead and copper foil so that they can choose
based on the specifics of the project, not by what they know and don't
know. Symmetrical designs should ALWAYS be leaded, not foiled, and that
includes almost all beveled artworks.
2)
Studios or individual stained glass artists who use lead or copper foil
around the outside edge of a stained glass or
beveled glass panel. Many glass artists use a
soft metal like lead because [a] they know too little about proper
reinforcement of the artworks they make, or [b] they aren't skilled
enough to make the artwork come out square (or round or whatever), or
[c] they aren't skilled enough to make the artwork come out the exact
right size. Regardless of which of these reasons result in artworks
edged in lead or copper foil, this is a giant red flag, in my opinion
(the exception to this may be the tiny background-less skiers,
sailboats, pieces of fruit, etc. known collectively as "suncatchers"
that many glass artists [me included] make early in their glass-making
careers and which a few artisans choose to make a full-time career of).
Any artwork that has an area of more than one square foot or has an
overall shape that is square, rectangular, circular, oval, octagonal,
etc. should have a reinforced outer edge made out of some other metal
than lead or copper foil. The most common option is zinc came, which
comes in many "U" or single-channeled sizes (as opposed to the "H" or
double-channeled type of came used for interior leadlines). Most "U"
zinc cames have an enclosed air-filled space built in, adding even more
strength. Brass is also an option here, but usually for smaller panels
since most brass cames I've seen have no enclosed air-filled space.
The most common
reason for using lead around the outside edge of a stained or beveled
glass artwork is that the artisan cannot make the artwork the exact
size it needs to be (poor mechanical drawing skills, poor glass
cutting, poor leading or copper foiling, etc. all lead to an artwork
that is "off" in size if not in other ways too). Lead around the
outside edge, especially double-channeled or "H" lead cames) allow the
artisan to shave down or hammer down the overall size of the artwork at
the time of installation. Unfortunately, this results in an artwork
that has all of it's weight on a soft metal "H". Over time, the bottom
channel will compress, allowing the artwork to sink down within the
space in which it is installed. This results in the outer edge showing
more at the top of the artwork than at the bottom. I have even seen a
visible gap at the top of an installed artwork where the artwork has
sunk low enough to reveal its entire upper edge and more. Here the word
"installed" refers to artworks that are mounted in a wood or metal
frame as well as those mounted in an actual window.
For hanging
artworks that have no wood or metal frame, a
reinforced edge is particularly important. Here, a lead or copper foil
edge will usually result in the artwork sagging out of shape over time
until gaps of light are visible within the interior of the artwork or
around its edge. This is a fairly good indicator of either a poor
attitude ("...it's cheaper and I'll sell the artwork long before the
flaws show up.") or a craftsperson who has started selling his or her
artworks before learning enough about the craft. Again, ask questions!
3)
When a mounted artwork has a came around its outer edge that is too
large to be fully hidden by the frame or molding that holds it in place.
This can be found in both hanging and mounted artworks. Although this
last item may be just a matter of taste, it may also be an indicator of
poor craftsmanship. Here the edge came can be seen sticking out beyond
the wood or metal in which it's mounted. I think this looks bad
artistically, so I always use a 1/2 inch "U" zinc edging where a 5/8 or
3/4 inch molding will hold the artwork in place, or a 1/4 inch "U" zinc
edging where a 3/8 inch molding will hold the artwork in place, etc.
Since I make all of my pieces to be exactly 1/16 of an inch smaller
than the opening in which they will be mounted, none of the edging came
shows (especially at the top of the artwork). Some artists may do this
because they think it looks best for the edging to show, but this may
also be the work of an artisan who cannot make the artwork come out the
right size, and so uses a soft lead edge around the artwork (see #2
just above). Once again, find out why the artist does this and don't
hesitate to "read between the lines" of what the artist is telling you.
Well,
that's about it. I've probably forgotten something, but this should be
enough to help you choose a skilled glass craftsperson or studio (and
to impress your friends at the next cocktail party where stained glass
technique comes up). If you wish, you may contact me (here)
to ask
a clarifying question.
Remember, there
are far too many inexperienced glass "hobbyists" parading as
professional artisans. I can't tell you how many people have seen my
work at craft fairs and whine to me about the art glass commission they
had done for their home or office that's falling apart or just isn't up
to the level of my work (and for which they paid the same as I would
have charged them). Be wary! Be willing to ask informed questions. Ask
to see both leaded and copper foiled examples of the work of an artisan
before commissioning an artwork. Be willing to shop around. Be assured
of the craftsmanship as well as the design abilities of an artisan
before proceeding with a commission or purchasing a ready-made artwork.
There are artisans out there who have good artistic ideas and drawing
capabilities, but poor craftsmanship. There are also those who craft
well but whose art is borrowed rather than original. You deserve both
original design and good craftsmanship. Be sure BEFORE you "sign on
the dotted line."
I hope this has helped.
UPDATE: GIANT RED FLAGS!
Alright... I've just found another
stained glass web site that is LYING to the public. This is
probably the dozenth (is that a word?) time I've found an unscrupulous
company attempting to fool people into thinking that images on their
web site are actual stained glass when, in fact, they are just
drawings or doctored photographs! So, even though everything I've ever read says never put down
the "other guy" while promoting yourself, I'm so fed up with this that
I just have to speak out. Here's what you need to look for...
IMAGES THAT DON'T EVEN LOOK REAL
If it doesn't look like real stained
glass, it probably isn't. More and more web sites are showing images
that are just drawings. This means they DID NOT ACTUALLY MAKE what
you're looking at, and may or may not be qualified to do so. There are
drawing programs designed for stained glass that can produce designs
that look almost like real glass. Quick giveaways include...
[1] solid white (or solid color) backgrounds
- When taking a photo of a stained glass window, whatever is behind the
glass will almost always show though to some point. An image that has a
solid background could be a drawing. If you see this, look closer and
if you contact these people, ask direct questions about whether a
particular image is a photo or a drawing.
[2] fills that don't look like real glass
- A "fill" is a computer-generated color or pattern that can be used to
color in a space that is surrounded by a black line (WOW! just like in
real stained glass - how convenient!). Fills are not able to emmulate
the true beauty or variety of real stained glass. If it doesn't look
like glass, it may not be. Another way to spot a fill is that the
drawing program often uses the same fill to color in multiple spaces in
the same image. If you see a pattern in a fill that repeats in other
pieces of glass, it's a drawing, not a real stained glass window. Study
the patterns in the glass closely. Real glass will NEVER have repeats
in the patterns. Drawings will often have these repeats.
[3] photographic fills that repeat
- Nowadays, some stained glass drawing programs can even import images
of real glass to be used as fills. While this is great for showing a
client what their custom stained glass might look like, it is also
being used to misrepresent drawings as the real thing. The giveaway,
once again, is that repeats can be found in different pieces. Say a
wispy amber is being used for the background of a religious window
(like I just saw on one web site)... there will probably be multiple
pieces filled in with the photograph of a wispy amber glass. Look for
repeats in the patterns of the glass. Real glass will NEVER have exact
repeats. Some of the repeats may have been stretched in one dimension
or made bigger to fill a larger piece of glass, but if you look
closely, you will see the repetition.
[4] drawings that are repeated in a setting
- In the web site that I just visited that got me angry enough to add
these red flags to this web page, not only were there numerous examples
of religious windows that were drawings masquerading as real stained
glass windows, but these drawings were pasted into photographs of
internal and external church walls to make it look like they had done a
whole row of matching windows. By looking closely, I could see the
repeats in the patterns in the glass from one window to the next. I
could also see how the stained glass did not quite fit the window
openings into which they had been inserted.
WHEN YOU FIND STAINED GLASS DRAWINGS BEING
PRESENTED AS ACTUAL STAINED GLASS, CONTACT THE WEB SITE TO LET THEM
KNOW THAT THIS PRACTICE HAS RESULTED IN YOU NOT USING THEM! Maybe then this will stop.
|


